Wednesday, December 29, 2010

Friendly faces on a cold day

It has been cold and snowy here for the past few days. Which has made going outside to play a much less appealing activity for me... But there is still a Little Girl to entertain, so I have been doing my best to be creative. One problem though, is that when I ask Little Girl what she would like to do, her answer is usually "Elmo!" Well, we can only watch so many Elmo DVDs in a day (that would be one...!), and her Elmo stuffed animals and coloring book don't hold her attention for as long as other activities. So today I decided to get creative. It had been a few days since I had baked anything, and we should be getting some company tomorrow, so I thought it only appropriate to multitask. I asked Little Girl if she would like to help me make Elmo cupcakes. She was pretty excited about the idea, so I figured we should go for it. I started my looking on-line for different examples of Elmo cupcakes. I then needed to think about what I had on hand to use for decorations. My two concerns were: 1) I didn't have enough eggs to make both cakes and frosting and 2) the only red food coloring I had was liquid drops - I knew that would water down the frosting and end up pink... So Little Girl and I made a quick trip to the c
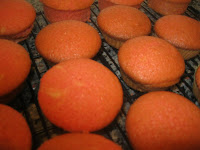
raft store and the neighboring grocery store for gel color and eggs. Tools in hand, it was time to bake.
I used my regular yellow cake recipe, but added a whole lot of red (liquid) food coloring to it. How much? Oh, something like 18 drops. And the result? Still pink. But oh well, the cakes cooked up nicely, so I figured that the pink base would be fine...!
Next, it was frosting time. I used the same frosting recipe I used for my birthday cake a few weeks ago. I then added my new red gel food coloring. I watched the gel mix into the white frosting... and watched it turn pink. I added more gel. Still pink. Hmm... Not how I had hoped things would go... I decided to use the pink as a base coat on the cakes while I tried to figure out how to make sure Elmo didn't wind up being pink through and through...
When I spoke with my sister later in the day she offered her bright red sanding sugar to me, but the little matters of a 45 minute drive between our houses and her just getting home after having a baby (welcome home, Baby Boy!!) made it so that the genuine offer wasn't very practical. But it got me thinking. With the gel coloring, I wouldn't have to worry too much about dissolving... I would try to make my own red sugar! While I think that my fingers might be permanently stained, I wound up with a great color that was much more appropriately Elmo than the pink was!!
With the color right, it was time to make the facial features. I didn't have marshmallows or black decorating icing or anything. But I did have miniature spice gel candies, mini chocolate chips and small chocolate sandwich cookies. Those turned into eyes, noses and mouths.
This was a lot of prep work, and I wasn't even done yet. But it was finally time for the last step. Assembly. I have to admit, though, I was enjoying myself the whole time. (Well, except for the part where it was a little creepy seeing 16 pairs of little googly eyes staring at me...!) I couldn't wait to see how they looked put together. And I was also curious to see if Little Girl would like them.

When she woke up from her nap I brought her to the kitchen to see who was there. She took one look and answered, with a huge smile:


ELMO!!!

Totally worth it!


Thursday, December 23, 2010

Daring to do it: Stollen

The 2010 December Daring Bakers’ challenge was hosted by Penny of Sweet Sadie’s Baking. She chose to challenge Daring Bakers’ to make Stollen. She adapted a friend’s family recipe and combined it with information from friends, techniques from Peter Reinhart’s book.........and Martha Stewart’s demonstration.

While I can't say it was a surprise, I was a little... frustrated? disappointed? concerned? when I saw that the December Daring Bakers' challenge was something so very Christmassy. Me being so very Jewish, I was considering sitting this one out, more on principle than anything else. That and the fact that this looked to be a lot like a fruitcake. Something I never had any interest in even trying... But after thinking about it for a couple of days, I realized that this might be an interesting one to do, Christmassy or not. For one thing, my mother-in-law loves fruitcake, so this might be something nice for her to enjoy. For another, my husband's family is of German descent - Pennsylvania Dutch. ("If you ain't Dutch, you ain't much," as my husband has said on occasion...!) This being a traditional German treat, it was just another reason to give it a try.

Once I decided that I was going to take part in this challenge, I had to decide how I was going to put my own spin on it. I knew I wouldn't be using candied fruits, as I don't have any interest in them. I knew I would not be using any nuts, as we have not yet given Little Girl any nuts. And I knew I wouldn't be soaking anything in rum, as we don't have any, don't drink it, don't like it, and otherwise have no reason to keep it around! Looking at all of these limits I was giving myself, I again thought about sitting this round out. Then I got inspired. Really, I think it was the huge bag of dried cranberries that got me. I decided to make two different versions of the stollen - both using cranberries as the primary fruit component.

My first stollen would be made for a holiday party for the mom's group I am a part of. This one was an orange-cranberry-white chocolate stollen. I soaked the cranberries in orange juice, and used only orange zest in the dough. The dough was not difficult to make, but it did take a lot of dishes, and I was really glad to have the use of my KitchenAid to do the kneading! Once the dough was made it went into the fridge for a nice, slow, cool rising. I actually kept the dough in there for about three days. Other than taking up a lot of room, it wasn't even close to an issue! When it was time to make the stollen, I took it out and let it warm up for a couple of hours. The next step was to roll the dough out. This is not something I am used to doing for bread...! For this first go, I actually don't think I rolled the dough thin enough... Oops... Before rolling the dough into a log, I sprinkled chopped white chocolate chips onto the surface, just to add more dimension to the final product. Once rolled, the log was formed into a ring. Penny had wanted us to shape our stollen like wreaths in honor of the holiday. As wonderful as Penny is, and as amazing as her stollen looked, I just didn't feel right making a wreath. So I stuck to a ring. Another rise and it was into the oven to bake. But the baking isn't the last step...! As soon as the stollen came out of the oven it was time to brush the whole thing with melted butter (or margarine, in my case...) then give it a few generous dustings of powdered sugar. Messy? Absolutely. Worth the mess? Heck, yeah! The finished stollen looked like a snow covered island. Because this was made for a party, I couldn't test taste it or there would be a big gaping hole... Luckily, though, I had planned ahead... Before forming my ring I had cut off a small section of dough and made a mini "bun" to taste. I am glad I did, too...! The stollen was enjoyed all around, both at home and at the party. So I was really glad that I hadn't walked away from this challenge!
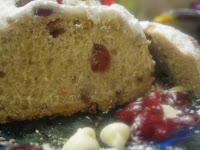
But I wasn't done. Remember that Pennsylvania Dutch family of mine? I still wanted to do a stollen for them, too! So I made my second version - lemon-cranberry-dried pineapple with cinnamon sugar stollen. This time around I rolled my dough thinner, making for better rings. I also decided to make three smaller loaves and a set of six muffins instead of one large loaf. This way I could give one to my parents-in-law, one to my siblings-in law, have some for snacking, and even have one for myself! I have not yet had the chance to taste this creation, but I am really looking forward to it... The smell of it baking was amazing, and the combination of the lemon and cranberry, with the bits of pineapple... So tempting! But I am trying to keep things intact until they can get to my in-laws' house tomorrow...

Thank you so much, Penny, for encouraging me, and the rest of the Daring Barkers, to try something so wonderful. I can honestly say this is not a recipe I would have ever made were it not for the challenge, and I am really glad that you gave me the opportunity and the push to do it! If you want to see what the other amazing Bakers did with their stollen, take a look here!

Tuesday, December 14, 2010

Daring to do it: Poaching

Jenn (from Jenn Cuisine) and Jill have challenged The Daring Cooks to learn to perfect the technique of poaching an egg. They chose Eggs Benedict recipe from Alton Brown, Oeufs en Meurette from Cooking with Wine by Anne Willan, and Homemade Sundried Tomato & Pine Nut Seitan Sausages (poached) courtesy of Trudy of Veggie num num.

I have, in the past, tried my hand at poaching eggs. While they turned out tasty, they were not all that attractive, and I didn't feel like I had actually done the process as it deserved to be done. I had even recently torn out an article from a cooking magazine to which I subscribe about how to have better success poaching eggs. Then came this challenge! The timing couldn't have been better if I had planned it myself! What made the timing even more amusing was that the challenge was announced on a day where my weekly meal plan had us scheduled for eggs for dinner! The stars were absolutely aligned, this was something I was supposed to do!

Luckily for me, the hosts of this challenge were much more interested in getting us Daring Cooks to poach than they were in having us follow the exact recipes they provided. Even making substitutions for vegetarianism/Kashrut, Eggs Bennedict with its Hollandaise sauce wasn't something I felt the need to try. And the Oeufs en Meurette would be great, except we are not wine drinkers, so the wine poached eggs/sauce probably wouldn't have been appreciated... (The vegan sausages looked really great, but I didn't feel quite up to that challenge...) So I decided to be somewhat creative and give things my own spin.

While I was not making Eggs Bennedict, I did decide that English muffins would be a great base for my dish. After looking at a variety of recipes online, I decided to go with this one. I did sub in some whole wheat flour, which I was very glad to have done. I also baked them in the oven instead of using the pan fry/bake method. Again, I was very happy with this decision! The muffins came out beautifully and deliciously. I will never buy English Muffins again!!

Then next step was to tackle the poached eggs. The hosts gave a whole list of suggestions to try, some of which I had heard, some I had not. The one I made sure to use was adding vinegar to the poaching water. I don't know the science of it, but it does seem to help... I also made sure my water was simmering, not boiling and not simply warm. This did help a lot. My whites did spread a bit more than I would have liked, but I was much more successful this time than I had been on my previous foray into poached eggs!
Finally it was time to assemble my dish. I started with warm English muffins, then placed a slice of cheese on each half. Onto the cheese went a poached egg, and all of it was covered with warm tomato sauce. Served with roasted asparagus and butternut squash, this was an amazingly delicious meal!! All of us agreed that this was something to be made and enjoyed again!!

So it seemed I was done with this month's Daring Cook's challenge. On the first day. Huh? I knew I couldn't let it go at that. So I gave it one more stab. On the last day. Yes, this post goes up on the 14th, I made another poached egg dish on the 13th. It seems I was into the timing extremes on this one. For this meal I wanted to do something similar to what I have done in the past as a comfort meal: eggs poached directly in tomato sauce. Eggs and tomato go so well together... Instead of using a bread base this time I made pasta to use under sauteed spinach and garlic topped with a roasted vegetable tomato sauce in which I poached the eggs. (It sounds kind of fancier than I meant it to be when it is all spelled out there...) This, again, was really yummy. The spinach and the tomatoes and the egg just worked so well together! They made for a great sauce for the pasta, and it was a great, hearty and comforting treat.
So thank you to Jenn and Jill for such a great challenge! I had so much fun trying different combinations, and poached eggs (and, hopefully, other things!) will definitely make it into our regular meal rotation!
To the the amazing creations of my fellow Daring Cooks, check things out here!

Sunday, December 12, 2010

Happy Birthday to Me!!

So today is my birthday! Yay! I still love birthdays. Not for the years, not for the presents, and not for the center of attention thing. I just love birthdays. It is fun to celebrate, share happy occasions, and have an excuse to make and eat cake! When I said something about making my own birthday cake, Hubby was shocked. "You shouldn't have to make your own birthday cake!" But I have fun baking, so I explained that this was actually something fun for me. I searched high and low for the perfect shape cake for my birthday, and came up with nothing good. Sure there are some amazing cakes out there, but there wasn't anything that seemed right to me... So I stuck with traditional round cake, and decided that it would be fun anyway!
This year Little Girl was able to help me make my cake. Last night we made my regular yellow cake recipe, but added some cocoa powder to make it a marble cake, which is my favorite. She helped me measure, pour, mix and smooth the cakes, which was a ton of fun!! I did decide to do the marbling myself, though... I just thought it might be less of a mess that way...
Tonight it was time to make the frosting. The traditional white frosting that I grew up making requires a double boiler and a hand mixer. A double boiler I can improvise, but the lack of a hand mixer would have made it a bit tough. So I searched around and found this recipe for Fluffy White Frosting. So similar to the one I grew up with, but even easier! I think this is going to be my new go-to frosting recipe!! I was so amazed when, after walking away from the mixer for a few minutes, I saw how light and fluffy this became!
Finally it was time to assemble the cake. I used some triple berry sauce (store bought... sorry!) between the layers, just because I like it! (It's my birthday, I get to do my own thing!) Then the frosting! Lots and lots of smooth, fluffy, marshmallowy frosting! I usually make a mess with this part, which is fine... I make the mess, I clean it up...! But this frosting was so easy to work with! I had fun covering the tops and sides, and even making a little bit of a swirly design.
Now a white cake is pretty and all, but I wanted a little bit more festivity. So on with the colorful sugar sprinkles!! Now this is a birthday cake!!
I would like to thank my family and friends for making this such a fun birthday. I am very lucky to have such wonderful people around me!
But now it is cake time!! Enjoy!!

Wednesday, December 8, 2010

When laziness wins...

The meal plan for the week showed that tonight's dinner was to be a baked vegetable and pasta dish. Nothing fancy, nothing too involved. Especially because I still had a nice variety of vegetables left in my refrigerator all ready to be used. So while Little Girl napped, I started chopping. As I chopped, though, I realized that I had a lot of veggies. A whole lot. More than would fit in any of my pans to be sauteed before being tossed in with the pasta. And I am way too lazy to use multiple pans - more dishes to wash? No, thank you!
I then realized that I didn't have to saute. I could roast. Why did I never think of this before? No worrying about overcooking none veggie or undercooking another by adding them in the "wrong" order. I pulled out my biggest baking dish and threw everything in all at once - onions, carrots, parsnips, peppers, zucchini, yellow squash, tomatoes, garlic... Add some olive oil and some spiced and get the whole thing into a 425 degree oven, and no more thought necessary!!

Once the veggies were cooked, I added a can of kidney beans, shredded cheese and the cooked pasta. After popping the whole thing into the oven, dinner was ready.
I don't know why I never did this before. In addition to saving on prep dishes in need of washing, roasting the vegetables added a whole new layer of flavor that I never thought of!! This was a wonderful dinner, with plenty of leftovers for Hubby to take to work for lunches! I can't wait to make this one again!

Saturday, November 27, 2010

Daring to do it: Crostata

The 2010 November Daring Bakers’ challenge was hosted by Simona of briciole. She chose to challenge Daring Bakers’ to make pasta frolla for a crostata. She used her own experience as a source, as well as information from Pellegrino Artusi’s Science in the Kitchen and the Art of Eating Well.


This was a fun challenge. It was the kind of thing that allowed for a lot of freedom, which meant that I could do whatever I wanted! (Which is actually a double edged sword - I love the freedom, but it also leave open a lot of "what about this?" questioning...!) I knew I would do a sweet crostata. I mean, really, I love sweets, so why wouldn't I? I was trying to figure out, though, what I could do for a savory one. There were a bunch of ideas floating around, but I just wasn't sure if any of them would actually work...


For my sweet crostata, though, my ideas were coming fast and furious. Jam! Fresh fruits! Chocolate under a vanilla pastry cream! Really, there was too much, and I was a bit concerned that I wouldn't make any of them since I wouldn't be able to decide. Then I looked at the week's supermarket circulars and saw that fresh raspberries were on sale. Mmm... Raspberries are my absolute favorite. Then I remembered one other thing - I had two beautiful lemons sitting in my kitchen which had been grown on the tree in my mother's backyard. Lemon and raspberry... Perfect!

Simona gave us two recipe options for the pasta frolla, or crostata crust, dough. I chose the first option, as the second contained a variety of flours and such that I don't keep on hand. As I usually do, I used vegetable shortening instead of butter to keep my dough dairy free. This recipe was very much like the pie crust I usually make, except this on uses eggs rather than water. I was a little concerned, it did not look like there would be enough moisture to hold the dough together. But it really did come out beautifully! I was really impressed by the tender dough that held together so nicely.

For my lemon layer I made the same lemon curd that my family has always made for our lemon meringue pies. It was strange, though, because we usually only make that pie on passover. So my recipe calls for potato starch. Which I don't have in the house. It took me a moment to remember that potato starch is really the passover substitute for corn starch, and that it really was ok to use the corn version! The fresh lemons were so good in the curd! The whole kitchen smelled lemony, it was heavenly!

Because I was using a cold, precooked filling, my pasta frolla crust would need to be prebaked, or blind baked. This was process which seemed to be new to a number of my fellow Daring Bakers. But I have done it a number of times, when making my home made pie crusts. This challenge gave me another opportunity to pull out my trusty, fancy pie weights! Dried beans and rice to the rescue! This challenge also gave me the chance to buy myself a present of a tart pan. I was very excited about it! Because I was prebaking my crust, I knew I was not going to be making the lattice top for my crostata. I was a little happy about that, since I am a little intimidated by making the lattice... Instead I used the extra pasta frolla to make heart shaped cookies, which turned out to be really tasty!


Crust cooked and cooled, curd chilled and ready, it was time to put everything together. My finished crostata looked so good! I couldn't wait to cut into it!! My parents-in-law came for lunch, so this was set to be the perfect dessert. Finally it was time to cut...

It seems my lemon curd did not set up as well as I thought it had. It was a little bit leaky... But the taste was AMAZING! All of us had a hard time keeping our forks out of the dish to take more tastes! And the fresh raspberries complimented the lemon to well. The crust was like a big, subtle sugar cookie. This was a fabulous treat!

With the success of the sweet crostata, I decided to just do it and go for a savory one. I used the same pasta frolla recipe, but cut the sugar from a cup to about a tablespoon. This time I knew I would be baking the filling, so I left the extra dough to make my lattice. That was hard! I knew there was a reason I kept avoiding it! The dough was very fragile, and I had a hard time getting my strips up from the counter onto the pie... But I eventually got there...! For my filling I used spinach, onions, eggs and cheeses. It was quiche-esque, but crossed with a savory cheesecake texture. Yet again, this crostata was a success! It was a satisfying, filling, delicious dinner that was enjoyed by all!


Thank you so much, Simona, for such a wonderful challenge! This is such a fun, versatile dish, I know I will be making it again and again! If you want to see the amazing creations my fellow Daring Bakers came up with, take a look here! I guarantee it, you will not be disappointed!

Thursday, November 25, 2010

Happy Turkey Day!

Another November, another Thanksgiving here in the States. This being our first year in our new home, we really wanted to host the meal. And, our family being as great as they are, they agreed to let us! This might not seem like a big sacrifice on anyone's part, having someone else do the bulk of the cooking, baking and cleaning, but you have to remember that we have a Kosher, vegetarian household and my in-laws are neither of those things. So Thanksgiving here means a break from the traditional traditions.

We do what we affectionately call the "All Dessert Thanksgiving" in my family. There is a real meal before the dessert part, but the Thanksgiving-y stuff is all at dessert. The centerpiece of our table, though, is still the turkey. It just isn't the same turkey most think of. Our turkey is made of cake, frosting, and any decorations we choose. My nieces were here to help me, Little Girl and my best friend make this one of the best turkeys ever!!


I hope that your Thanksgiving (if you celebrate it!) was filled with great food, wonderful people and tons of joy! Enjoy your own family traditions, no matter how strange they are!!

Sunday, November 14, 2010

Daring to do it: Souffle

Dave and Linda from Monkeyshines in the Kitchen chose SoufflĂ©s as our November 2010 Daring Cooks’ Challenge! Dave and Linda provided two of their own delicious recipes plus a sinfully decadent chocolate soufflĂ© recipe adapted from Gordon Ramsay’s recipe found at the BBC Good Food website.

This was an amazing challenge. Souffle is one of those dishes that everyone is intimidated by, but, in reality, isn't as hard as it seems. I had made souffle once before (I don't even remember what kind...!) and was really excited to do it again. Especially with the tips and guidance of some amazing fellow Daring Cooks! I only had one regret with this challenge. I only made one souffle during the course of the month. I had planned on making a sweet souffle at some point, but it never happened. Sad... But, luckily, I am not limited by the month of the challenge! So hopefully sometime soon you will check back here and see a delicious sweet souffle!!
Now to the one I did make....
One of the challenge recipes provided was for a Watercress Souffle. Sounded good, and was a nice, vegetarian recipe to use. But I have never used watercress. Nor do I care to. Not that I have anything against it, I just am not jumping up and down to try it. Not when I could easily substitute one of my favorite leafy veggies - spinach. So I adapted the recipe a little to make my own spinach and cheese souffle.
Souffle is basically composed of two basic parts - the beaten egg whites and the base. The egg whites give the souffle its trademark lift and fragility, while the base provides the flavor and the "structure." The base recipe Dave and Linda gave us was really like making a white sauce - make a roux, add the liquid, add the flavoring/cheese. Their method, though, added the liquid in small batches rather than all at once. It worked so well! I have to try to remember that the next time I want to make home-made mac and cheese! Once the sauce is made, it is time to add the egg yolks. Dave and Linda recommended tempering the yolks before adding them by, essentially, cooking them over a double boiler. This was a method I had never heard of before, but it worked well. It brought the yolks safely up in temperature for health reasons and for ease of adding to the base. Yet another great trick learned courtesy of the Daring Kitchen!!

The egg white part of the souffle is the one which most people get nervous about. Whipping egg whites can be intimidating. Whip them too much and they separate into dry and wet elements. Too little and they don't have enough air to do much of anything. I must say, though, I love my KitchenAid mixer...! It made whipping the egg whites easy - just a matter of watching them! Nice and firm peaks, not too stiff, but plenty of hold.
Egg whites whipped, base ready, only a few more steps. Prepare the baking dish - butter the dish well, then coat the dish with something - in this case grated cheese - to help the souffle climb, and also to provide a bit of texture. Then the base and the whites have to be combined carefully - mixed enough to combine, but not so much that the egg whites deflate. Finally the mixture is poured into the prepared dish, then the whole thing goes into the oven. One of the hardest parts of souffle making is keeping the oven door closed during the baking process. Letting heat out of the oven makes it so that the souffle won't rise as much. Thankfully I have a window in my oven door, and I was able to watch the progress safely!!


Yeah, it rose a little crooked, and no, it didn't get as high and fluffy as I would have liked. But oh well. The important part (as with so many things...!) was what was on the inside. I had a nice crispy crust, and then the inside:

It held its form, but was still a little gooey... Yum! This was an delicious dinner! We all agreed - even Little Girl!
As I said at the start, this was an amazing challenge! It brought out such creativity among the Daring Cooks, you have to check out their work! Dave and Linda, thank you so much! I am so glad to have this in my arsenal now, and I really am looking forward to making this dessert souffle soon!

Wednesday, November 10, 2010

My Budding Artist

As you have probably guessed, I enjoy being crafty. I don't exactly see myself as a talented artist, but I am a crafter who has a lot of fun creating things. Little Girl, subsequently, sees a lot of me puttering around with food, fabric, yarn, crayons and more. I have always hoped that she would enjoy some of these activities, too... She seems to have fun in the kitchen, playing with her kitchen tools and helping me cook and bake. And with our book club, I have seen her enjoy coloring and crafting, which is a ton of fun.
The other day we went to one of my favorite places to explore - the craft store. I love looking for new ideas and seeing what is out there, even if I don't buy much. One thing I couldn't pass on, though, was a foil poster featuring Little Girl's favorite fairy friends. With the hefty price tag of one whole dollar, I knew this was a splurge that would be worth it. And it really was! Little Girl LOVED coloring the fairies and seeing the shimmery foil background. She did really well with the markers, too, opening them and even getting the caps back on fairly securely! It is so rewarding to see her enjoy herself, and at an activity that I enjoy, too! I really am the luckiest mommy in the world with my amazing, crafty girl!!

Wednesday, November 3, 2010

Sharing the love

Sometimes it is hard to imagine that there is actually anyone out there who is looking at your blog. It is a big world, and there are blogs out the wazzoo!! And while I mainly keep this up for myself, it is really nice hearing every once in a while that what I say (or cook, or bake, or make) made someone smile. I love sharing my fun with my friends and family, and this blog has been a great way to do that.
Recently, though, I was touchd in a whole new way. One of the bloggers whom I love to follow recognized me as an inspiration! I was shocked, flattered, and a little overwhelmed. How does one respond when a role model says s/he appreciates what you do? It really just makes me see how lucky I am.
So I would like to share Anula's award with some of the people who have inspired me, and kept me going when I felt like blogging was just sending my words into a void.
Anula chose seven people and their blogs. She then asked us to share this award with seven people of our own - people who inspire us to do what we do. It is actually a lot harder that you would think!! She requests, and I do too, that this award keeps going - that you choose seven people you admire, whose blogs are a part of your web-surfing rituals, and let them know that you appreciate them welcoming you into their lives the way I appreciate you folks doing with me!


In no particular order:
  • Beth from Someone's in the Kitchen with Brina - I love your style, your creativity, and having Jewish holiday foods to drool over!
  • Shelley from CMomCook - hey, if it were't for you, I probably wouldn't have started this thing...!
  • Audax from Audax Artifex - you are an inspiration month in and month out in the Daring Kitchen, and your love for what you do comes through in all of your creations!
  • tease-spoonof sugar - your recipes are always so yummy looking, and your kids are just beautiful!
  • myrecessionkitchen - budget friendly, crafty, and presonable, all rolled into one!
  • Aparna from My Diverse Kitchen - beautiful photography, creative recipes, and all around lovely to read!

And, of course, I can not make this list without mentioning:

  • Anna from Anula's Kitchen - Your blog is one I love to look at, your cfreativity amazes me, and your love for life is truly inspirational!!

Sunday, October 31, 2010

Happy Halloween!

While Little Girl was around for Halloween last year, and I did make her a costume, she was a little too young to go trick-or-treating. So this year was going to be a big one - our first Halloween in our new house, and Little Girl's first time going out in costume! (Ok, she is still a little young for it, but oh well!)

Hubby and I have decided that Little Girl can be anything she wants to for Halloween, but the deal is we will make her costume, not buy it. This works out great for Hubby, as I am the one who does the making...! But it is fun for me, and was really my thought to begin with, so no complaints! This year, as she is still a little too young to choose for herself, I chose to make a costume based on one of Little Girl's favorite characters. I made her into Tinker Bell! Working with wings from the dollar store and a shirt from the clearance rack, I made a no-sew costume that wound up looking great!! And she really had a blast, loving running around with her wings on! Hubby is already excited for next year!!


And, despite the fact that she can't eat the majority of it, Little Girl wound up with a pretty good haul for a one year old!